QUALITY AND SPECIFICATION |
| ISC
recognizes
that quality systems are essential ingredients for
elastomer production. ISO 9001 and QS 9000
certification aid us in consistently producing
high-quality seals. The specifications, in addition,
are designed to ensure performance.
The purpose of a quality control system is to take steps to assure the consistent performance of the parts produced. O-rings and elastomeric seals are used in many different applications and environments. A manufacturer�s quality system must address facets of the production process to assure a quality level adequate for the seal�s intended use. Consistency is a critical parameter when looking at individual seals within a �batch� or between seals produced from different batches. Quality of O-rings and seals can be separated into three main areas of concern:
With diverse markets and product applications, there is a wide range of industry standards and specifications for elastomeric seals. This section covers some of the most prominent standards and specifications. Many of our products are produced to a very specific set of customer specifications. This section can serve as either a specification reference or a starting point for developing additional specifications. |
ISC's
quality system is based on controlling the
key elements of our materials and processes
to provide seals of unmatched consistency
and performance. We were the first O-ring
manufacturer in the United States to
achieve ISO 9002 certification (in 1994) and
the first O-ring manufacturer in the world
to achieve QS 9000 (in 1996). Our commitment
is to provide the highest quality
elastomeric parts at competitive prices. of unmatched consistency
and performance. We were the first O-ring
manufacturer in the United States to
achieve ISO 9002 certification (in 1994) and
the first O-ring manufacturer in the world
to achieve QS 9000 (in 1996). Our commitment
is to provide the highest quality
elastomeric parts at competitive prices.
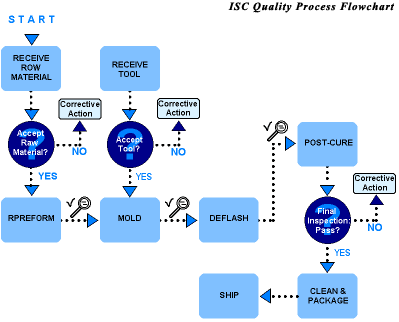
Our quality process flowchart illustrates the many areas which can affect the final part quality. From raw material testing and certification to specific inspection and acceptance criteria for our tooling, ISC carefully controls the quality of the raw materials. In-process sampling and testing confirms dimensional and surface quality levels of work in process. Finished product inspection assures final part quality for specific dimensional and surface-quality specifications. At ISC, each production job flows through the process with documentation of individual process conditions to provide complete traceability. Finished parts are packaged and labeled not only with the size and compound of the parts, but with lot number, batch and cure date information as well.
|
| Specifications for physical properties
of elastomeric seals can be very general
or extremely specific in nature. Probably
the most common general classification
system is ASTM D 2000 �Standard
Classification System for Rubber Products
in Automotive Applications.� The
purpose of this classification system is
to aid in the selection of practical rubber
products for specific environments. It
also provides a �line call-out� designation
for the specification of materials.
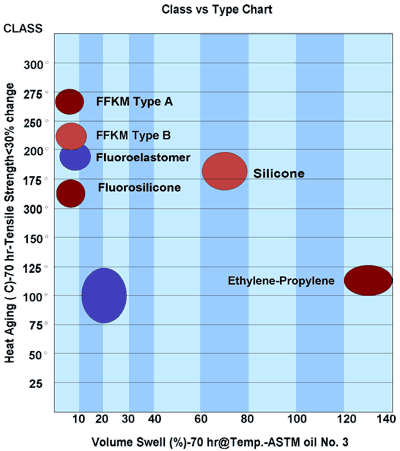
Rubber materials are designated by type (heat resistance) and class (oil resistance). The heat resistance of an elastomer is based on changes in tensile strength of not more than � 30%, elongation of not more than �50%, and hardness of not more than �15 points after 70 hours of aging at the specified temperature. The oil resistance is based on the volume swell of an elastomer after a 70-hour immersion in ASTM Oil No. 3. An example of the general classification positioning of different elastomers is shown in the chart below.
Another general material specification standard is the Japanese Industrial Standard (JIS) B 2401 �O-rings.�The classification system recommended by this standard is twofold, by material and by use. The size and �use� standard is included on pages 145 and 155�159. The material classification is as follows:
Other standards exist for the purpose of classifying and specifying elastomers for specific applications or environments. Among these standards are the Society of Automotive Engineers (SAE), and many governmental agencies, including the military. SAE J120a �Rubber Rings for Automotive Applications� is a recommended practice for the design and specification for static and dynamic, 70 Shore A hardness seals. Materials are classified and may be marked as: Class I� Oil-resistant service (yellow-colored stripe), or, Class II� Gasoline-resistant service (red-colored stripe) The table on the following page highlights several key Aerospace Material Specifications (AMS), Military (MIL), and National Sanitation Foundation (NSF) standards. These standards cover a wide range of sealing applications and materials. Many of these standards require independent or accredited laboratory certification of the materials. In some instances, Underwriter�s Laboratory (UL) approval is required. |
|
SURFACE QUALITY SPECIFICATIONS |
| The quality of the
surface of an O-ring has a great influence over its sealing
and contamination performance. Several industry standards exist for the
identification of surface quality. Visual inspection standards are written
for imperfection detection with the unaided eye. Magnification is used for
reference purposes only.
The Rubber Manufacturers Association (RMA) OR-1 O-ring Inspection Guide� Surface Imperfections Control is intended to provide manufacturers and users with seals that have a surface quality adequate for intended use. The Military Standard MIL STD 413 C is the most common surface standard for O-rings and contains standard imperfection classifications. Imperfections are typically classified into eight (8) categories. In addition, different surface quality specifications may be necessary for non-O- ring parts. Common specifications for non-standard parts include surface rough-ness (measured by profilometer), external and internal voids and color. A similar standard for surface quality is included in DIN 3771 (German) standards. Backrind
A shallow recess located on the parting line at the ID of OD.
Any contamination or depression formed by its
removal.
A continuous ridge of material on the parting line at the OD and/or ID within specified limits.
A randomly spaced indentation having coarser than the
O-ring surface.
Surface indentations caused by hardened deposits on the mold cavity.
Thread-like recesses, usually curved, caused by an incomplete flow and curing of the elastomer.
Misaligned (off-register) or mis-sized (mismatch)
cross-sectional halves.
|
|
DIMENSIONAL SPECIFICATIONS |
| The U.S. O-ring market is
dominated by the Aerospace Standard (AS) 568 �Aerospace Size Standard for
O-rings� specifications for inner diameter and cross-section diameter, as
well as parting line height and projection. The British Standard
Institution (BSI) BS 1806 �Dimensions of Toroidal Sealing Rings
(�O�-rings) and Their Housings (Inch Series).� This standard includes many
sizes listed in the AS 568.
The Japanese market relies on Japanese Industrial Standard (JIS) B 2401 specifications (P for packing or dynamic seals, G for gasket or static seals, and V for vacuum flange seals). International markets may also reference standard metric sizes, contained in a number of international standards. A major International Standard is from the International Organization for Standardization (ISO) ISO 3601-1 �Fluid Systems�Sealing Devices� O-rings�Part 1.� Additional standards include the BS metric, DIN 3771 (German), French, Swedish, etc.
| ||||||||||||||||||||||||||||||||||||||||||||||||||||||
|
PSEUDO-STANDARDS |
| �Standard� sizes may be referenced by some companies with-out the AS 568 prefix. This may be because of different shrinkage classes of different elastomers producing parts in the same general size as AS 568, but with different tolerances (or mean) values. In addition, certain manufacturers may also add additional sizes as �pseudo-standard� sizes. Examples include Parker Hannifin �5-Series,� the NOK �S-series,� and �fill-in� AS 568 sizes, such as �179, and �412 to �424. The latter practice, while expedient, is discouraged because it may imply a standard which in fact does not exist. |


 A longitudinal recess oriented circumferentially and
located only at the parting lines. Edges are irregular and can be
present on the full circumference on the OD and/or ID within the specified
limits
 Parting Line Indentation
 Foreign Material
 Parting Line Projection and Excessive
Flash
 Non-Fill
 Mold Deposit
Indentations
 Flow
Marks
 Off-Register
and/or Mismatch